
I know I've been quiet for the past month so I thought I'd stop by to let you know that I'm still alive. Im just on vacation! and I will be for a while longer. I still monitor my stores tho so dont worry about that. In fact we just moved to a larger slot on the same sim, near my old place. MM is up atm with one of my latest creations to attract people and show off my new place. :p
Take care and see you soon!
Thursday, July 9, 2009
Tuesday, June 2, 2009
Hints and help - yup a second post today!
-This guide requires photoshop! If anyone has a guide similar to mine fitted for GIMP or if you are willing to adjust this post for GIMP please let me know. =) -
I have decided to write a short tutorial/hint about photo's in secondlife. This tutorial will talk about how to make things like posters in an easy painless way.. I will not tell you how to design your poster but I will tell you how to get your designs in it.
First, the best way to take pictures in SL (unless you are wanting the SL environment, it sometimes looks more natural/realistic to use an SL environment) is to use a photobooth/studio with a "full bright" background created specifically for what we're going to do. Full bright is a setting you can enable in any prim that yu have modify rights on, it makes the color completely solid with no shadows, shadow is an enemy in this case. There are many pre-made photostudios for sale around SL and on XSL. These normally include alot of poses and options for modifying your background. I normally use Rudolf Moo's studio, it's several different photostudios rezzed in-world and free to use , these photostudios are also for sale if you would like to use them somewhere more private - on your own land.
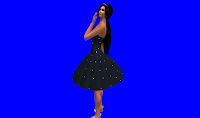
We are going to be extracting your model from the in-world screenshots we will be taking to put on your background of choice. For best result we will want to choose a background color that doesnt match any color of the outfit/skin/attachments... well ANYTHING that you want to keep on your model. For example if your outfit is white and you use a white background then most of the outfit will disappear when we extract the picture.. So here I am at Rudolf's studio. Wearing black and using a full bright blue background.. sometimes you might want to be careful with picking a color that is to hot or too different from your outfit as it might leave a thin line around the model - I noticed this especially with hot pink or magenta.
You will have to play around a bit with the lighting of your image, an option is to use "midday" in world > environment settings and combine it with a good facelight I really like Ghosty's polite facelight. It's not the most avanced but it like it bcause its not too strong... unless you want it to be. There's also special lights designed for photographing with different strengths and colors.
Here's a tip tho for good lighting in any picture without the use of any facelights. http://secondsoigne.wordpress.com/2008/04/10/optimising-windlight-for-avatars-20/
The difference is amazing, you have to be careful tho, while this setup does not require any facelights - if you choose to use a facelight anyway it may become very bright and wash out parts of the face.
Anyway, back on track. We now have a nice screenshot that we want to work with, in my case my model(me) wearing a black polkadot dress on a full bright blue bakground.
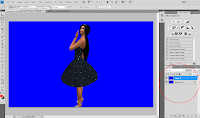
Open Photoshop then click 'File>Open' and find your picture. Click 'open' - you should now see the screenshot in your photoshop window.
Now here's how I do it. Look at the layers palette, it should be to your right and if you look at the layer thats already there it is locked. This is because it is a background layer. To get a layer of the picture that you can actually work on you can either rename the layer which automatically unlocks it. This is done by double-clicking the layer name - a small window will popup allowing you to change the layername. The way I do it tho is by pressing CTRL+J, this will duplicate the background layer so that the original image is still intact if you mess up. It should now look like this:
Disable the bottom layer by pressing the little eye-icon next to it in the list.
The simple way:
Select the Magic Wand Tool, it should be in the top left of your screen in the tools bar or you can activate it by pressing the W key. Now click anywhere in the(in my case) blue area to select all of that color that is connected to it. Press the delete key(or go to edit>clear) to delete the selection. If theres still some blue left then do the same thing in that area aswell, click to select - press delete to remove. Repeat this until all blue is removed and you are satisfied with your picture.
The other simple way:
Go to 'Select>Color range' and a new window will popup. In this window the most important thing to do is to open the drop-down menu by 'Select' and choose Sampled Colors then uncheck the box next to 'Localized Color Clusters'.
Now with the popup still up click anywhere in the blue in the main window to select it then hold down the TAB key and click on another blue area that didnt get selected in the first click. You can see the total selection in the popupwindow in the preview. It's a good idea to click a few spots around hair strands aswell to get some of the darker colored blue that was created by semi-transparent textures. These blue spots on your hair might not be very noticeable right now but if you use a different color background in your final image it can really stand out...
When you are satisfied with your selection click 'Ok' to create the selection then click the delete button to remove the selection.
You now have your model extracted and ready for use in your artwork/poster. Go to 'Select>Select All' or press CTRL+A to select the image then go to 'Edit>Copy' or CTRL+C to copy it. You can now paste it into any image you want by pressing CTRL+V or 'Paste' in the edt menu. You can now save a PSD(photoshop file) of this project by going to 'File>Save As' this way you wont have to redo the process if you ever need the image again.
Not bad for 1 minutes work - right?
My final result:

I have decided to write a short tutorial/hint about photo's in secondlife. This tutorial will talk about how to make things like posters in an easy painless way.. I will not tell you how to design your poster but I will tell you how to get your designs in it.
First, the best way to take pictures in SL (unless you are wanting the SL environment, it sometimes looks more natural/realistic to use an SL environment) is to use a photobooth/studio with a "full bright" background created specifically for what we're going to do. Full bright is a setting you can enable in any prim that yu have modify rights on, it makes the color completely solid with no shadows, shadow is an enemy in this case. There are many pre-made photostudios for sale around SL and on XSL. These normally include alot of poses and options for modifying your background. I normally use Rudolf Moo's studio, it's several different photostudios rezzed in-world and free to use , these photostudios are also for sale if you would like to use them somewhere more private - on your own land.
We are going to be extracting your model from the in-world screenshots we will be taking to put on your background of choice. For best result we will want to choose a background color that doesnt match any color of the outfit/skin/attachments... well ANYTHING that you want to keep on your model. For example if your outfit is white and you use a white background then most of the outfit will disappear when we extract the picture.. So here I am at Rudolf's studio. Wearing black and using a full bright blue background.. sometimes you might want to be careful with picking a color that is to hot or too different from your outfit as it might leave a thin line around the model - I noticed this especially with hot pink or magenta.

You will have to play around a bit with the lighting of your image, an option is to use "midday" in world > environment settings and combine it with a good facelight I really like Ghosty's polite facelight. It's not the most avanced but it like it bcause its not too strong... unless you want it to be. There's also special lights designed for photographing with different strengths and colors.
Here's a tip tho for good lighting in any picture without the use of any facelights. http://secondsoigne.wordpress.com/2008/04/10/optimising-windlight-for-avatars-20/
The difference is amazing, you have to be careful tho, while this setup does not require any facelights - if you choose to use a facelight anyway it may become very bright and wash out parts of the face.
Anyway, back on track. We now have a nice screenshot that we want to work with, in my case my model(me) wearing a black polkadot dress on a full bright blue bakground.
Open Photoshop then click 'File>Open' and find your picture. Click 'open' - you should now see the screenshot in your photoshop window.
Now here's how I do it. Look at the layers palette, it should be to your right and if you look at the layer thats already there it is locked. This is because it is a background layer. To get a layer of the picture that you can actually work on you can either rename the layer which automatically unlocks it. This is done by double-clicking the layer name - a small window will popup allowing you to change the layername. The way I do it tho is by pressing CTRL+J, this will duplicate the background layer so that the original image is still intact if you mess up. It should now look like this:

Disable the bottom layer by pressing the little eye-icon next to it in the list.
The simple way:
Select the Magic Wand Tool, it should be in the top left of your screen in the tools bar or you can activate it by pressing the W key. Now click anywhere in the(in my case) blue area to select all of that color that is connected to it. Press the delete key(or go to edit>clear) to delete the selection. If theres still some blue left then do the same thing in that area aswell, click to select - press delete to remove. Repeat this until all blue is removed and you are satisfied with your picture.
The other simple way:
Go to 'Select>Color range' and a new window will popup. In this window the most important thing to do is to open the drop-down menu by 'Select' and choose Sampled Colors then uncheck the box next to 'Localized Color Clusters'.
Now with the popup still up click anywhere in the blue in the main window to select it then hold down the TAB key and click on another blue area that didnt get selected in the first click. You can see the total selection in the popupwindow in the preview. It's a good idea to click a few spots around hair strands aswell to get some of the darker colored blue that was created by semi-transparent textures. These blue spots on your hair might not be very noticeable right now but if you use a different color background in your final image it can really stand out...
When you are satisfied with your selection click 'Ok' to create the selection then click the delete button to remove the selection.
You now have your model extracted and ready for use in your artwork/poster. Go to 'Select>Select All' or press CTRL+A to select the image then go to 'Edit>Copy' or CTRL+C to copy it. You can now paste it into any image you want by pressing CTRL+V or 'Paste' in the edt menu. You can now save a PSD(photoshop file) of this project by going to 'File>Save As' this way you wont have to redo the process if you ever need the image again.
Not bad for 1 minutes work - right?
My final result:
Dancing Queen young and fierce... wait, fierce?
Yeah yeah, me and my cheeeeezy titles! :p
'Dancing Queen' and 'Dancing Queen Starz' - a young and fierce "mix and match" outfit with optional strass pieces. Can be worn with pants or skirt.


New outfits
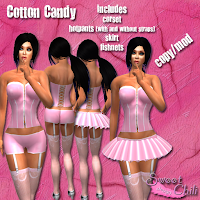
'Cotton Candy' - cutesy sexy corset worn with hotpants or skirt and light pink fishnets with or without straps.

'Dancing Queen' and 'Dancing Queen Starz' - a young and fierce "mix and match" outfit with optional strass pieces. Can be worn with pants or skirt.


As always my creations are very cheap because looking good does not have to cost a fortune!
Thursday, May 21, 2009
Another new one!
Yup, I told you I had more coming up. =)
So here is my dress that I decided to call "Dilemma"
It was made for and inspired by the runway show I was in last week at the Downtown Model Agency. The theme was "angels and devils" can you guess what I did? Both! No, I didnt enter the runway twice... See for yourself.
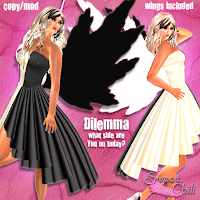
It is now up for sale in my store for 49L. Because looking good shouldnt cost a fortune ;)
There is also a groupgift coming up. It's all ready, I just havent had time to box it up yet but it will be out today. Make sure to join the subscribe-o-matic goup because that's where it will be sent out.
Wednesday, May 20, 2009
Lots and lots of new releases!
Oh where to begin? I've been a busy little girl.. I dont know what happened, all of a sudden I had 4 new items up for sale... and still have more ready for sale!
I guess since Im such a naughty little lazy blogger and didnt blog for a while I will have to start in chronological order.

First up this week was my new, very popular swimsuit 'Elegant tease'.
I put it in my MM board pre-release and it seemed fairly popular. Way more people stuck around than usual. The Board filled up pretty fast but since I had already promised to force it on a certain time it did not have a chance to lock.
The MM board was set up by Nightclub Phantasm as they were having their big opening party. So it was a mix of an opening gift and a way to get people to see the club. I have to add that the club was looking FAB on that day. You see, everytime they have a themeparty they refurnish and remodel the whole club both outside and insides. This time it was a fantasy theme and it was so beautiful. This club goes one step further in entertainment they really do!
Next up on the list of releases are these 2 bikinis 'American kini' and 'Swedish kini'. Yes, more swimwear, it is summer isnt it? :p
Not quite as popular, no wonder really. You would have to be either Swedish or American and proud of it to want to wear any of these. The good news is that they do indeed fit you even if you are not swedish or american! Swedish-kini and American-kini are my new, improved versions of the bikini available for free in my store. This was it's original purpose, I was just feeling too lazy to finish it!
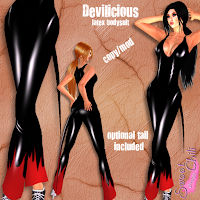
Finally my latest release. This one was put on my MM board pre-release aswell as people seem to appreciate when I do this. I put it up yeterday afternoon and it locked with in 30 minutes(way to go people)!
It is a latex bodysuit. Hot, devilish, 'Devilicious'!
I guess since Im such a naughty little lazy blogger and didnt blog for a while I will have to start in chronological order.

First up this week was my new, very popular swimsuit 'Elegant tease'.
I put it in my MM board pre-release and it seemed fairly popular. Way more people stuck around than usual. The Board filled up pretty fast but since I had already promised to force it on a certain time it did not have a chance to lock.
The MM board was set up by Nightclub Phantasm as they were having their big opening party. So it was a mix of an opening gift and a way to get people to see the club. I have to add that the club was looking FAB on that day. You see, everytime they have a themeparty they refurnish and remodel the whole club both outside and insides. This time it was a fantasy theme and it was so beautiful. This club goes one step further in entertainment they really do!
Next up on the list of releases are these 2 bikinis 'American kini' and 'Swedish kini'. Yes, more swimwear, it is summer isnt it? :p


Not quite as popular, no wonder really. You would have to be either Swedish or American and proud of it to want to wear any of these. The good news is that they do indeed fit you even if you are not swedish or american! Swedish-kini and American-kini are my new, improved versions of the bikini available for free in my store. This was it's original purpose, I was just feeling too lazy to finish it!
Finally my latest release. This one was put on my MM board pre-release aswell as people seem to appreciate when I do this. I put it up yeterday afternoon and it locked with in 30 minutes(way to go people)!
It is a latex bodysuit. Hot, devilish, 'Devilicious'!

Saturday, May 16, 2009
I love Lucky Designs! =)
Yep, it's true that buying my MidnightMania board was the best thing I've done for my business, and when the creator behind the MM board offered an upgrade to the copy version - it didnt take long for me to make up my mind. So... not long ago the next big hit from Lucky Designs arrived. This time it isnt an item really... its more of a big BIG game tieing together all the previous Lucky Design products and community around it. Let me tell you, this is so much fun, now youre not only getting your favorite freebies from the lucky chairs, lucky cupcakes and other lucky products. You're also collecting points that you can use to get tickets, which in turn can be used to exchange for special items at various stores. There is also an island high up in the sky with several games and activities that can reward you points. One of them is 'Detonation' which is very much like minesweeper(sorry Shep ;p) so get practicing! The points you collect are called 'Kudos' and when you finish a task that rewards kudos you also get a badge, the list of badges can get pretty long! The link to this game which is also called the Lucky Tribe, can be found in my list of bloggers on the left side of my blog. =) Give it a try, it really is so much fun!
Sunday, May 10, 2009
A little something for the new ones..
Today I've decided to blog about all the very very generous designers out there. Especially the ones who go a little further to help newbie out. I'm talking about the ones who have a constant special offer for new avatars, usually avatars less than 30 days old. An example for this is a hair store called 'Gurl 6'. They have a VERY generous offer - any avatar can go to their store an pick up a notecard to fill out, they get to pick ONE hairstyle, any hairstyle they want in their entire store for FREE. If you're a member of their group you will get every single color pack for that hairstyle aswell. I did this when I was born and I got 60 different colors of my favorite hairstyle. I use it all the time, even a year after I got it. Thank you Gurl 6 =)
So in this post I will keep a list of stores with this offer, if you know of any places like this or if you own a store with special newbie offers like this please let me know. Also as the post extends please let me know if any of the stores on the list does not have a noobie special anymore.
Gurl 6 - avatars less than 30 days old can pick one hairstyle for free. Pick up the notecard at their store for more info.
~Tea Lane~ - has a skin available for free for avatars less than 30 days old.
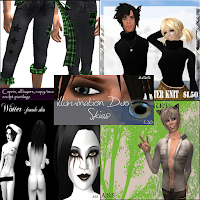
A:S:S - Has a great starter-package for new avatars less than 20 days old. There's so much in this package and it all looks great.
Here are some previews:
So in this post I will keep a list of stores with this offer, if you know of any places like this or if you own a store with special newbie offers like this please let me know. Also as the post extends please let me know if any of the stores on the list does not have a noobie special anymore.
Gurl 6 - avatars less than 30 days old can pick one hairstyle for free. Pick up the notecard at their store for more info.
~Tea Lane~ - has a skin available for free for avatars less than 30 days old.
A:S:S - Has a great starter-package for new avatars less than 20 days old. There's so much in this package and it all looks great.
Here are some previews:

Subscribe to:
Posts (Atom)