I have decided to write a short tutorial/hint about photo's in secondlife. This tutorial will talk about how to make things like posters in an easy painless way.. I will not tell you how to design your poster but I will tell you how to get your designs in it.
First, the best way to take pictures in SL (unless you are wanting the SL environment, it sometimes looks more natural/realistic to use an SL environment) is to use a photobooth/studio with a "full bright" background created specifically for what we're going to do. Full bright is a setting you can enable in any prim that yu have modify rights on, it makes the color completely solid with no shadows, shadow is an enemy in this case. There are many pre-made photostudios for sale around SL and on XSL. These normally include alot of poses and options for modifying your background. I normally use Rudolf Moo's studio, it's several different photostudios rezzed in-world and free to use , these photostudios are also for sale if you would like to use them somewhere more private - on your own land.
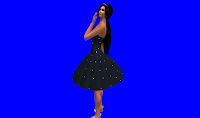
We are going to be extracting your model from the in-world screenshots we will be taking to put on your background of choice. For best result we will want to choose a background color that doesnt match any color of the outfit/skin/attachments... well ANYTHING that you want to keep on your model. For example if your outfit is white and you use a white background then most of the outfit will disappear when we extract the picture.. So here I am at Rudolf's studio. Wearing black and using a full bright blue background.. sometimes you might want to be careful with picking a color that is to hot or too different from your outfit as it might leave a thin line around the model - I noticed this especially with hot pink or magenta.

You will have to play around a bit with the lighting of your image, an option is to use "midday" in world > environment settings and combine it with a good facelight I really like Ghosty's polite facelight. It's not the most avanced but it like it bcause its not too strong... unless you want it to be. There's also special lights designed for photographing with different strengths and colors.
Here's a tip tho for good lighting in any picture without the use of any facelights. http://secondsoigne.wordpress.com/2008/04/10/optimising-windlight-for-avatars-20/
The difference is amazing, you have to be careful tho, while this setup does not require any facelights - if you choose to use a facelight anyway it may become very bright and wash out parts of the face.
Anyway, back on track. We now have a nice screenshot that we want to work with, in my case my model(me) wearing a black polkadot dress on a full bright blue bakground.
Open Photoshop then click 'File>Open' and find your picture. Click 'open' - you should now see the screenshot in your photoshop window.
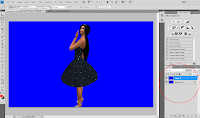
Now here's how I do it. Look at the layers palette, it should be to your right and if you look at the layer thats already there it is locked. This is because it is a background layer. To get a layer of the picture that you can actually work on you can either rename the layer which automatically unlocks it. This is done by double-clicking the layer name - a small window will popup allowing you to change the layername. The way I do it tho is by pressing CTRL+J, this will duplicate the background layer so that the original image is still intact if you mess up. It should now look like this:

Disable the bottom layer by pressing the little eye-icon next to it in the list.
The simple way:
Select the Magic Wand Tool, it should be in the top left of your screen in the tools bar or you can activate it by pressing the W key. Now click anywhere in the(in my case) blue area to select all of that color that is connected to it. Press the delete key(or go to edit>clear) to delete the selection. If theres still some blue left then do the same thing in that area aswell, click to select - press delete to remove. Repeat this until all blue is removed and you are satisfied with your picture.
The other simple way:
Go to 'Select>Color range' and a new window will popup. In this window the most important thing to do is to open the drop-down menu by 'Select' and choose Sampled Colors then uncheck the box next to 'Localized Color Clusters'.
Now with the popup still up click anywhere in the blue in the main window to select it then hold down the TAB key and click on another blue area that didnt get selected in the first click. You can see the total selection in the popupwindow in the preview. It's a good idea to click a few spots around hair strands aswell to get some of the darker colored blue that was created by semi-transparent textures. These blue spots on your hair might not be very noticeable right now but if you use a different color background in your final image it can really stand out...
When you are satisfied with your selection click 'Ok' to create the selection then click the delete button to remove the selection.
You now have your model extracted and ready for use in your artwork/poster. Go to 'Select>Select All' or press CTRL+A to select the image then go to 'Edit>Copy' or CTRL+C to copy it. You can now paste it into any image you want by pressing CTRL+V or 'Paste' in the edt menu. You can now save a PSD(photoshop file) of this project by going to 'File>Save As' this way you wont have to redo the process if you ever need the image again.
Not bad for 1 minutes work - right?
My final result:


thank you very informative
ReplyDelete